IDE
Using IDE for oVirt Engine
Reason
Java IDE Is very much like Vegemite1; Some really really like it, some like it as Marmite2 and some like it as Cenovis3. Others, simply can’t stand the thought of it…
As for Java IDE, some like Eclipse, some like Net Beans, and others can’t stand the thought of anything which is not VI.
This page is intended for those who would like to use some sort of a graphical development environment, which does not require the use of ‘esc’+’:’ combination ;)
Eclipse
- Recommended due to JBoss integration.
- May be used with Python as well: http://wiki.python.org/moin/EclipsePythonIntegration
- Current Eclipse release is Luna.
- Available from http://www.eclipse.org/downloads/, or yum install eclipse under Fedora.
- Use the J2EE distribution for developers.
Setting up oVirt engine development environment in Eclipse
- Before you start, perform a maven build from command line (refer Building oVirt engine). This makes sure that the generated code is available, and you won’t see too many compilation errors in eclipse after importing the projects.
- Install Maven plugin for Eclipse, if it is not installed by default
- Note: This is only relevant to old Eclipse version. In Eclipse Juno (and later), this plugin is bundled by default.
- Note: If you are using Maven 2.2, make sure you use m2e version 0.12.XXX, as later versions are not compatible with it.
>> open help -->
   install new software -->
   choose the Luna location -->
   filter by m2e
>> check all components, install and restart eclipse at the end
- Fix maven version
>> open Windows -->
   Preferences -->
   Maven -->
   Installations
>> Choose 3 installation. If it's not there, use the 'add' button and add the path to your Maven 3 installation.
- Import sources:
>> file -->
   import -->
   Maven -->
   Existing Maven Projects -->
   browse into your engine sources direcotry and click OK
- You may need to first build the project directly through maven as some referenced projects are auto generated. close eclipse, build with maven and open eclipse again.
- Make sure that you import the engine code formatter into eclipse before starting development. The engine maven build uses checkstyle to check coding standards. One of the standards checked is that the code should not contain tabs or trailing whitespaces. Since eclipse inserts tabs by default for code formatting, you can end up with a lot of compilation errors in command line maven build if you don’t follow this (and the next) step.
Window -> Preferences -> Java -> Code Style -> Formatter -> Import -> <ovirt-src-root>/config/engine-code-format.xml
- The above formatter however, doesn’t work with trailing whitespaces inside comments. To make sure that this is also taken care, add the following Save Action to the Java editor:
Window -> Preferences -> Java -> Editor -> Save Actions -> Additional Actions -> Configure -> Code Organizing -> Remove trailing whitespace -> All lines
- By now, hopefully, you should have resolved all compilation errors shown by eclipse, and ready to start development of oVirt engine.
- On some machines, editing a properties file in eclipse results in a lot of “diff” in git, making it difficult to review the code change. It may be a good idea to verify this in the beginning, and if the problem exists, edit the properties files using an external text editor.
Troubleshooting
- Eclipse may get stuck on start-up while building worspace with no progress.
Remove the following file: .metadata/.plugins/org.eclipse.core.resources/.snap and restart eclipse. If the above didn’t help try also removing .metadata/.plugins/org.eclipse.core.resources/.snap . These files should be located under workspace.
IntelliJ
- Install IntelliJ (there is a community edition)
http://www.jetbrains.com/idea/free_java_ide.html
- Run IntelliJ (make sure you have set JAVA_HOME variable first)
/yourIntelliJInstallLocation/bin/idea.sh
-
In order to open the ovirt-engine project, do:
File–>Open Project
Select the main pom.xml located at the root of the ovirt-engine directory. It should then open the project structure on the left pane (there is a package-based view as well similar to Eclipse. In order to switch to it, select in left upper corner of the left pane: “view as: Packages”). It also detects automatically the project is working with Git and its settings, and the right click menu adjusts to the Git integration.
- Eclipse code formatter - in order to be aligned with code formatting along the project, it is advised to work with the code styling configuration file that is based on Eclipse.
In order to use it in IntelliJ, please install the Eclipse Code Formatter plugin:
Settings --> IDE settings --> Plugins --> Available, search for Eclipse Code Formatter and right click "Install".
-
After plugin installation, go to:
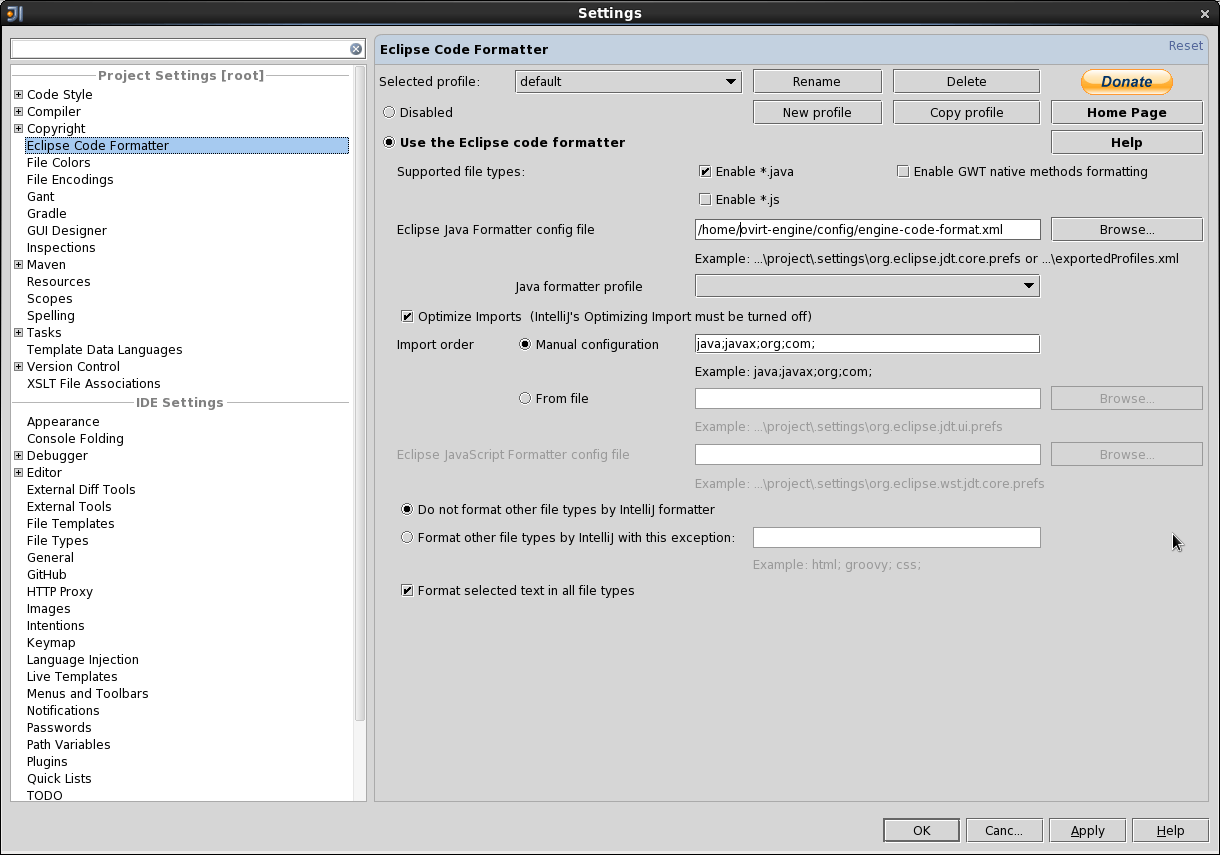
Settings –> Project Settings –> Eclipse Code Formatter
- Import the code styling xml that is part of the ovirt-engine project: ovirt-engine/config/engine-code-format.xml
- Make sure the Import order section is set on “Manual configuration” with the following order (that follows latest Eclipse defaults) : java;javax;org;com;
- Follow the “Optimize imports section” in the plugin’s help page:
https://github.com/krasa/EclipseCodeFormatter#instructions
Example: 
-
In order to prevent collapsing explicit class imports to one liner (e.g. com.my.package.*), do the following:
Settings -> Code Style -> Imports
Set “use single class import” as checked, and “class count” and “name count” settings to 99
- If you want the code formatting to run when you save a file, a-la Eclipse, you can follow these instructions.
- Maven configuration (not mandatory) - for easier development work (not need to use command line)
First, make sure that IntelliJ is pointed at the correct Maven configuration, especially if you have several different versions.
Settings--> Project Settings --> Maven
In order to benefit from the Maven integration and build the project from within IntelliJ , go to :
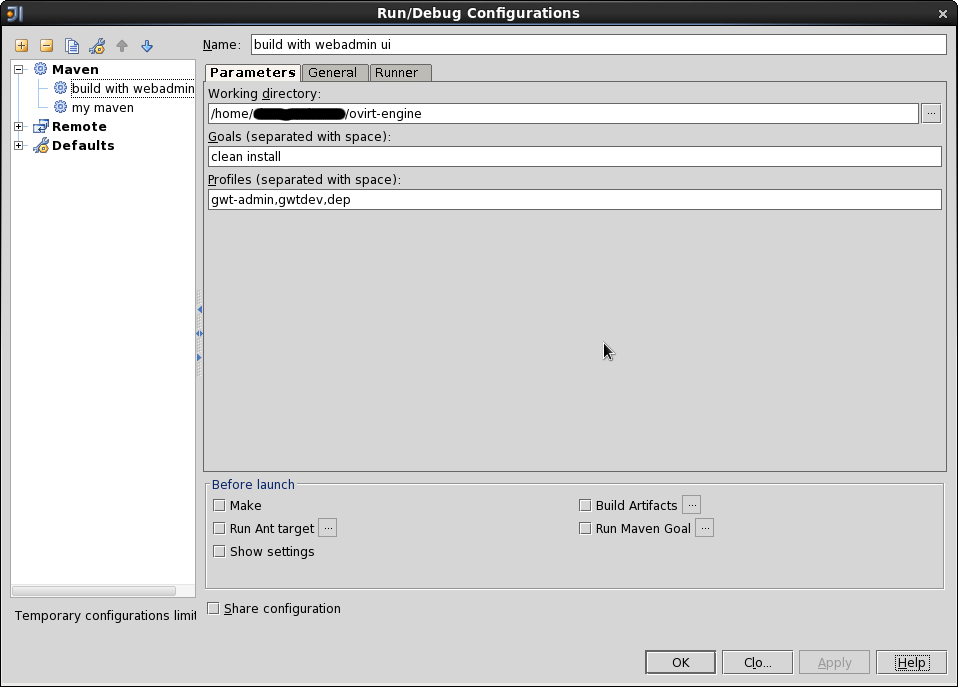
Run --> Edit configurations --> Add new configuration (select Maven)
- Give it a meaningful name (such as “build including UI”)
- Fill the working directory (where the parent pom.xml is located)
- Fill goals (for example - clean install)
- Fill profiles if exist (for example - gwtdev, gwt-admin, dep)
- If you need to set any -D flags , it is available in the Runner tab
Now you can always select this configuration from the combo box in the main pane, and press “run” (the green triangle) - it is equivalent to running “mvn clean install … “ from the command line.
Please note you can create several different configurations (with UI, without user portal, etc.)
Configuration example: 
Others
- Same as Net Beans…
- Backend with jrebel
Troubleshooting
- The following problem was encountered in eclipse, but is probably not confined to a specific IDE:
After build - Maven problem, invalid LOC header (bad signature). The fix:
delete repository
#> rm -rf ~/.m2/repository/*

use maven
#> mvn test
Some explanation: The cause of the problem is a corrupt jar in the maven repository, and the above removes all jars and re-downloads them when using maven. For more details read here.