Most of them are outdated, but provide historical design context.
They are not user documentation and should not be treated as such.
Documentation is available here.
noVNC console
Summary
The aim of this feature is to make it possible to connect to VM consoles using HTML 5 VNC client called “noVNC” in browsers supporting websockets and HTML5 postMessage function (webkit browsers, Firefox, IE > 10).
Owner
- Name: Frank Kobzik (Fkobzik)
- Email: fkobzik@redhat.com
Status
- Engine part of implementation (loading noVNC client and making it connect to websocket proxy using postMessage) - DONE
- Websockets proxy customization - DONE
- Security over TLS - DONE
Benefit to oVirt
- Enhanced options for connecting to virtual machine consoles in oVirt
- There is no need for users to have a native VNC client installed when using noVNC
Details
The noVNC client utilizes websockets for passing VNC data. However, VNC server in qemu doesn’t support websockets natively and there must be a websocket proxy placed between the client and VNC server. This proxy can run either on any node that has access to the host network, or it can run on each host.
(Note: There is a patch that integrates websockets directly to qemu, but it will not be merged into DS at the time we need it to be there. As soon as it's merged, we should switch to using this feature instead of standalone websockets server).
The noVNC client is a html5 page with javascript which talks to websocket server (e.g. python-websockify). This page is served by engine itself.
Upon establishing the VNC session, the noVNC client (HTML + js) must know where to connect. For passing such information, the HTML5 window.postMessage function can be used. As soon as the client receives the information, it connects to websockets proxy which runs on a particular host:port. Now the VNC information (vnc host:port, ticket) must be passed to the proxy to know where to connect. This information is passed via url path.
The websockets proxy reads data from the path and establishes connection to the VNC server.
noVNC client and python-websockify customization
There are two changes that must be made to noVNC client and websockify.
noVNC client changes
For our purposes, the noVNC client html page must listen to VNC information passed from the engine using HTML5 postMessage. This requires adding event listener “message” to the page. The handler receives information required for establishing VNC connection via websockets and passes it to websockets proxy. This information is:
- vnc host:port
- vnc password (ticket)
Additional information that client has to know is:
- websocket proxy host:port (passed via parameters in url)
The implementation modifies vnc_auto.html page that comes from noVNC client.
websockify changes
The implementation is based on nova-novnc proxy which reads a token from a cookie, makes an rpc call to the nova consoleauth node and retrieves all connection information (which is connected to this token).
In VDSM we have no such thing as nova token. We must pass all the connection info somehow. In the initial implementation it was passed via a cookie. However the new implementation passes it using url path.
After the proxy receives the data, it establishes the vnc connection.
Location of the websockets server
There are three possible places where the websocket server can run. The implementation supports each of these scenarios; the behavior in the engine is set in vdc_options:
- On the machine on which the engine is installed (Option WebSocketProxyConfig: Engine:port)
- On a single machine on which the engine is not installed (Option WebSocketProxyConfig: ip/hostname:port, where ip/hostname specify the host where the proxy runs)
- (On each host (Option WebSocketProxyConfig: Host:port)).
Security considerations
The websocket server runs on a specific port and allows clients to connect to any port on its machine. This is a potential security risk in that the attacker could bypass the firewall on server. For further information, see https://github.com/kanaka/noVNC/issues/49. OpenStack implements a customized version of the proxy (openstack-nova-novncproxy package) and verifies security-related information before a connection to the target host is actually created. With oVirt, this is not easily possible because we do not store the VNC ticket in the engine (afaik the only place in the system with knowledge of the ticket is the target host) so verification is impossible.
To address this issue, the websocket proxy uses digital signatures to verify VNC data. This data is signed by the engine.
Secure communication
Secure communication is ensured by using TLS. For this reason, websockets server must posses a key and certificate that is used for TLS communication. Moreover, the certificate must be trusted by users in their web browsers (or the client browser must trust the engine’s CA)!
The creation of key/cert pair could be part of engine setup process (together with JBoss, Apache and engine key/cert pairs).
Setup
Setup Websocket Proxy on the Engine During Install
Prerequisities: Browser that has proper websockets and postmessage support (tested with FF and Chrome)
- In the engine-setup answer ‘Yes’ to ‘Configure websocket proxy on the machine’”
- Import CA of the engine in your browser. You can download the certificate authority by navigating
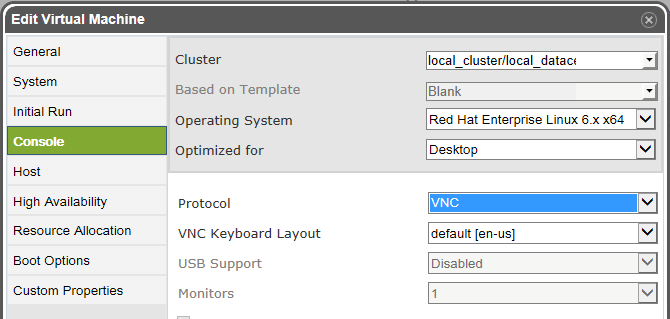
https://<your engine address>/ca.crt. - Set up a VM as usual, set its Display Type to VNC and run it.
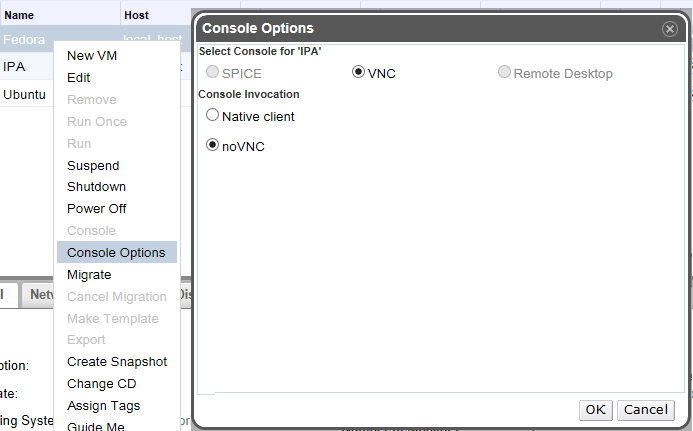
- In Console Options dialog, select ‘noVNC’
- Click the console button to invoke the console.
- (The console opens in a new tab and this behavior is usualy blocked by browsers. For opening the console you must allow displaying pop-up windows from engine’s domain.)
Results: The new browser tab with noVNC session appears.
Setup Websocket Proxy on the Engine Post Install
Execute:
# engine-setup --otopi-environment="OVESETUP_CONFIG/websocketProxyConfig=bool:True"
Setup Websocket Proxy on a Separate Machine
With release 3.5 oVirt supports also the deploy of WebSocket Proxy on a separate host via engine-setup; please follow this instruction: Features/WebSocketProxy on a separate host
Using noVNC
- Select or create a VM. While editing it, under console set its Display Type to VNC. Save and start the VM.
- Right click the VM and choose Console Options.
- Select ‘noVNC’, and click OK to save.
- Click the console button to invoke the console.
- (The console opens in a new tab and this behavior is usualy blocked by browsers. For opening the console you must allow displaying pop-up windows from engine’s domain and you must have Certificate Authority correctly imported in your browser.).