Most of them are outdated, but provide historical design context.
They are not user documentation and should not be treated as such.
Documentation is available here.
Foreman Integration
Summary
Foreman [1] The Foreman is a complete lifecycle management tool for physical and virtual servers. Through deep integration with configuration management, DHCP, DNS, TFTP, and PXE-based unattended installations, Foreman manages every stage of the lifecycle of your physical or virtual servers.
The Foreman provides comprehensive, auditable interaction facilities including a web frontend and robust, RESTful API.
Cloud-init [1] is a tool used to perform initial setup on cloud nodes, including networking, SSH keys, timezone, user data injection, and more. It is a service that runs on the guest, and supports various Linux distributions including Fedora, RHEL, and Ubuntu.
Integrating Foreman with oVirt will help adding hypervisor hosts that are managed by Foreman to the oVirt engine (already provisioned hosts or discovered hosts for bare-metal provisioning which will include the OS installation process.), VM configuration, package management and etc.
Owner
-
Name: Yaniv Bronheim
- Name: Oved Ourfali
- Email: ovedo@redhat.com
Current Status
- Supported in oVirt>=3.5 over RHEL>=6.6
- Tested with Satellite Version 6.0.4 (Setup details described in Make Foreman Appliance)
Detailed Description
Adding Foreman provider:
- In the tree on the left, press the “External Providers” tree item, and then you’ll see the Providers main tab on the right:
- Press “Add”, fill in the details:
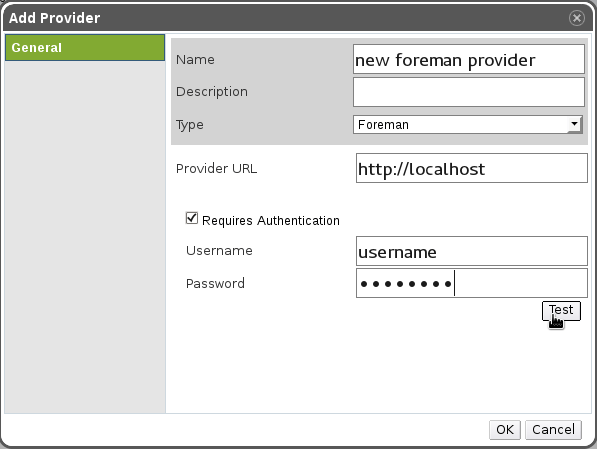
- In order to check connectivity and credentials to the external provider, press the “Test” button. The result will appear:
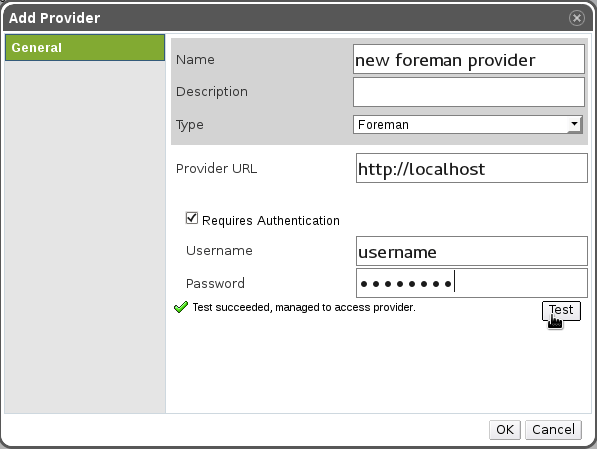
- If the provider is secured (https), the certificates will be read from it, and you’ll have an option to add them as trusted certificates.
Using the Foreman provider:
Adding installed Foreman hosts as oVirt hosts
When adding a new host to oVirt, the administrator has to know in advance different details about the host, such as the FQDN, root password, power management options and etc.
In this feature we will add a checkbox saying whether to show “external” hosts in the host dialog (external hosts are Foreman hosts, but in the future we might support other providers as well), and if so the hosts will be loaded from Foreman, and displayed in the external hosts list box. Once a user selects a host, it will automatically set the address as the FQDN we got from Foreman (non-changeable), and also set the name of the host to the FQDN (as a suggestion, changeable).
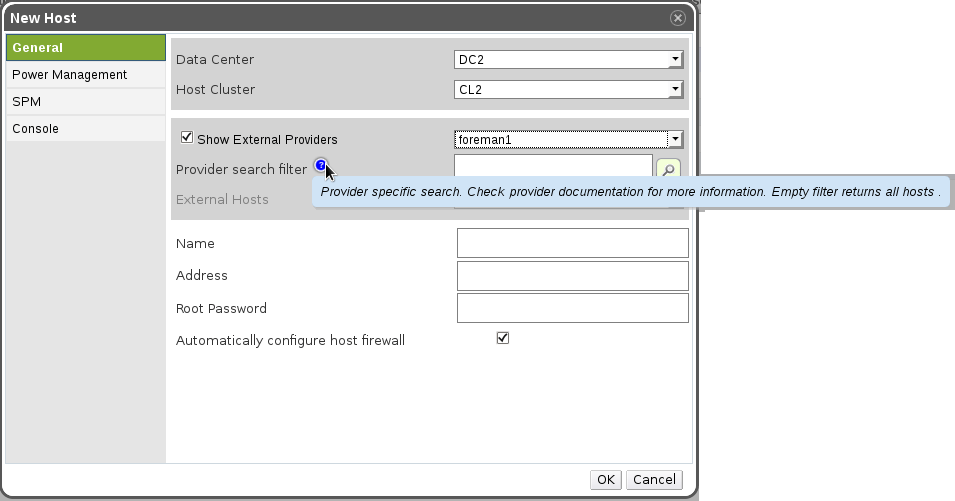
Screenshot 1 - The user didn’t choose to show external providers
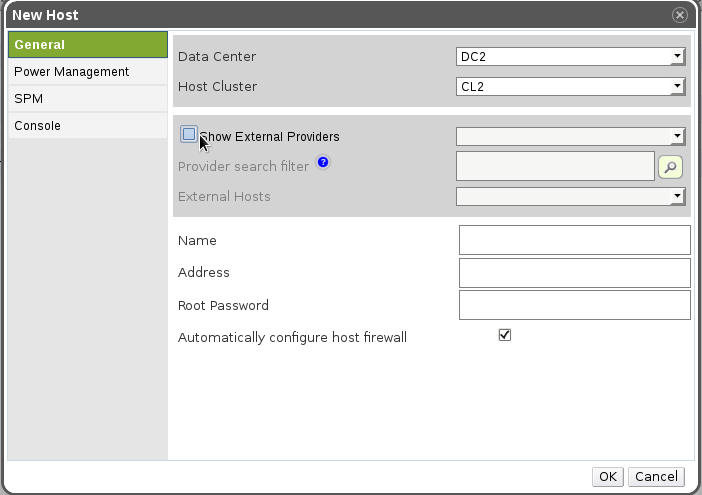
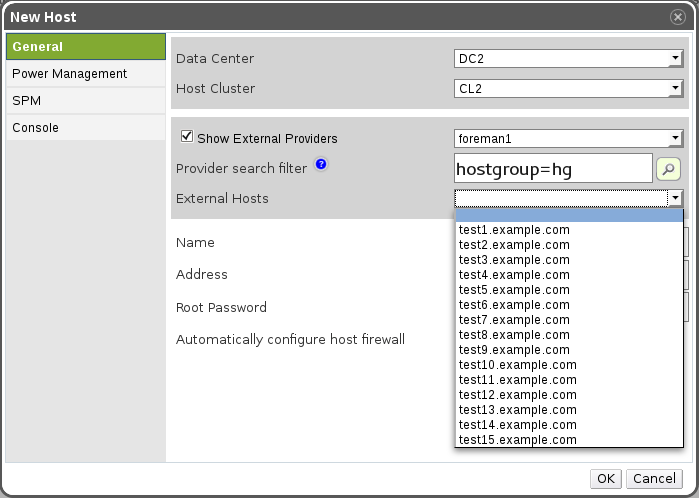
Screenshot 2 - The user chose to see the external providers, and he selects one of them. A free text search is shown (provider specific search), and the user can either write a search query, or just press the search button, which will retrieve all hosts.
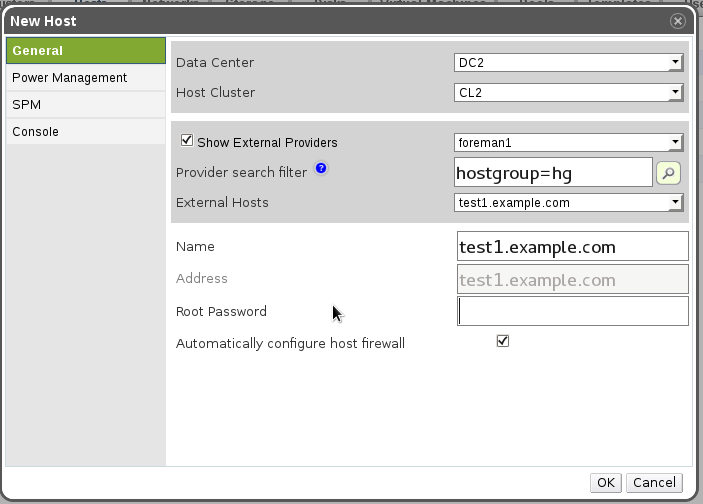
Screenshot 3 - Selecting a host. The name and address were updated automatically (and in the future also other properties)
Screenshot 4 - All the details that the host provider set, are updated automatically. The host address is grayed out. All the rest is editable.
Implementation Notes
API Design
No changes in the API. The external provider’s hosts will be shown only in the UI.
- Engine/Backend/DB
- Adding the provider DB/engine/UI and etc. is covered in another feature, Features/Detailed Quantum Integration.
- Additional changes:
- Adding a host provider interface, with implementation for Foreman
- The host provider will currently support listing hosts, filtered listing of hosts (we might add in the future a textbox in the add-host-dialog to support freetext search criteria), and testing connection (useful in the add provider dialog).
- Adding a query to get a provider by type (to get all the foreman providers)
- Adding a query to get all provider hosts
Bare-Metal Provisioning
Prerequisites:
- Set Satellite Discovery: https://access.redhat.com/documentation/en-US/Red_Hat_Satellite/6.0/html-single/User_Guide/#sect-Installing_the_Foreman_Discovery_Plugin
- Enable discovery
# foreman-installer --foreman-plugin-discovery-install-images --foreman-plugin-discovery-install-images - Add oVirt Provision Plugin:
# yum install ruby193-rubygem-ovirt_provision_plugin # foreman-installer --enable-foreman-plugin-ovirt-provision - Define Hostgroups: Foreman admin has a designated host group(s) in foreman for that purpose to define full provision setup with default values
- Have the proper images for the OS installation setup in the foreman setup
- Correlate the defined Host group with relevant templates (PXE / kickstart files) associated to the relevant OSs
- oVirt needs proper permissions to view relevant bare-metal hosts, host groups, compute resources and execute provision request [TODO define roles automatically]
- Set Foreman’s compute resource that correlates to the required permissions (Availability to approve and add host by oVirt provision plugin.
- Define puppet class for installing oVirt-Engine public key to allow deploy oVirt on provisioned host
(locate them under
/usr/share/puppet/modules) - example in Make Foreman Appliance.
Steps To Use:
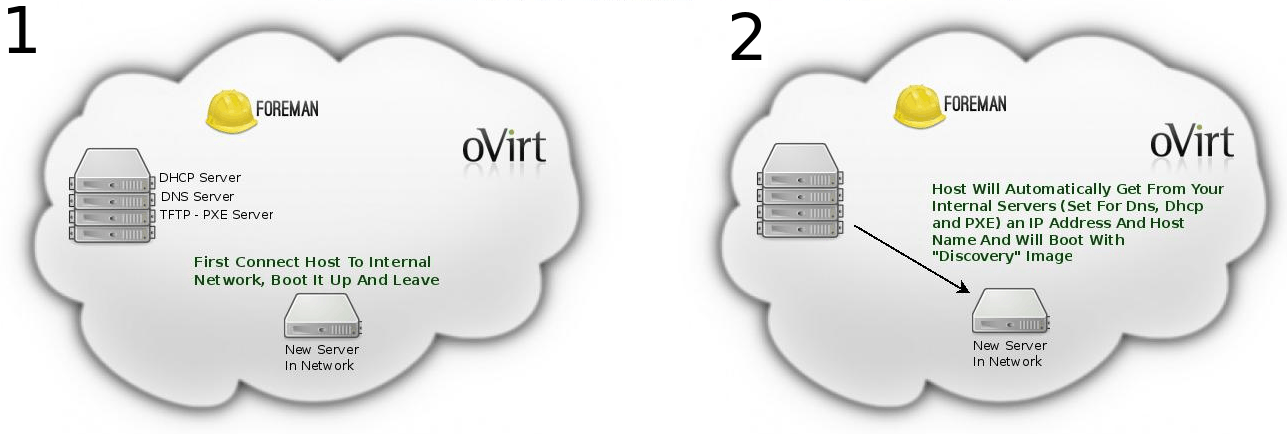
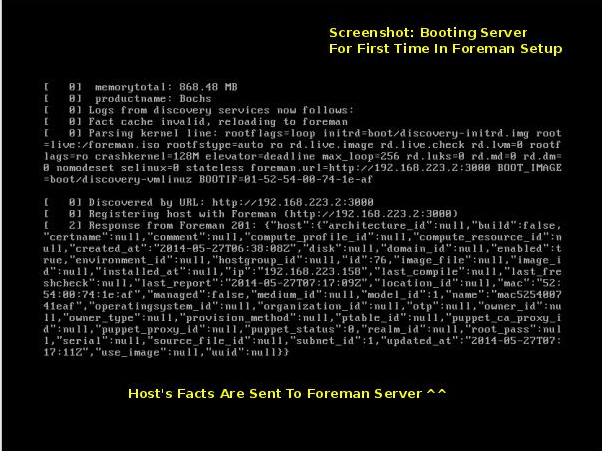
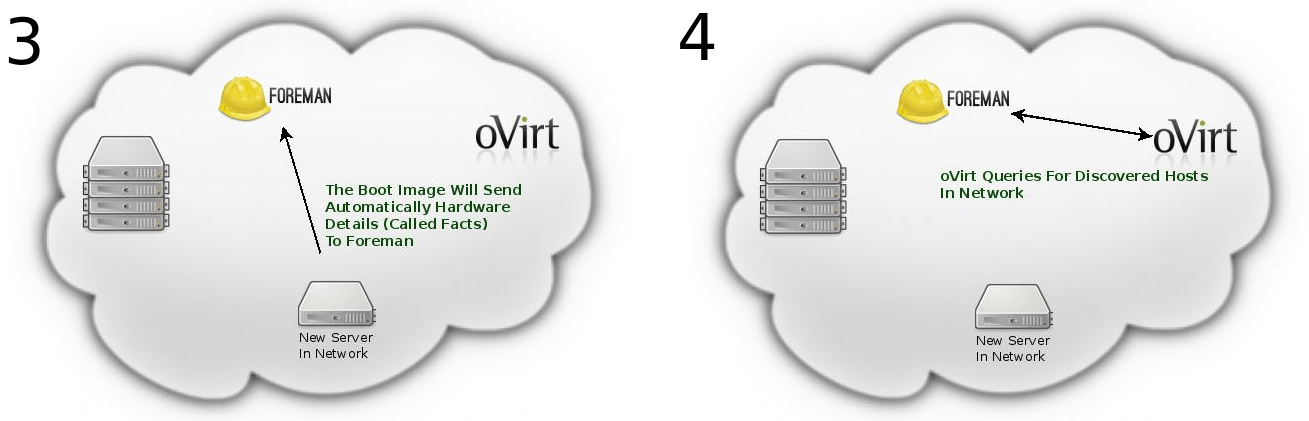
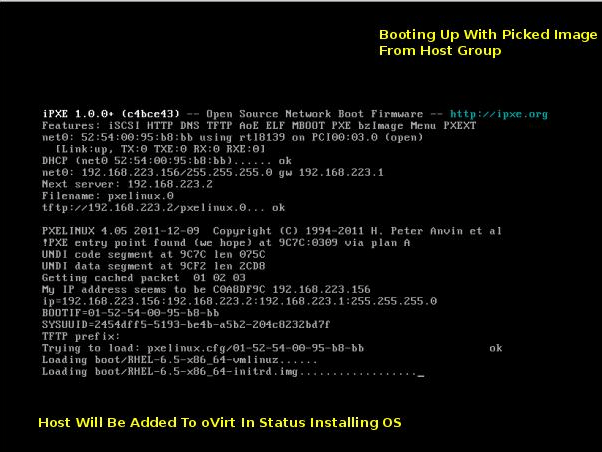
- Each new host in the network boots with the discovery image which registers the host’s info to Foreman under discovered hosts page.
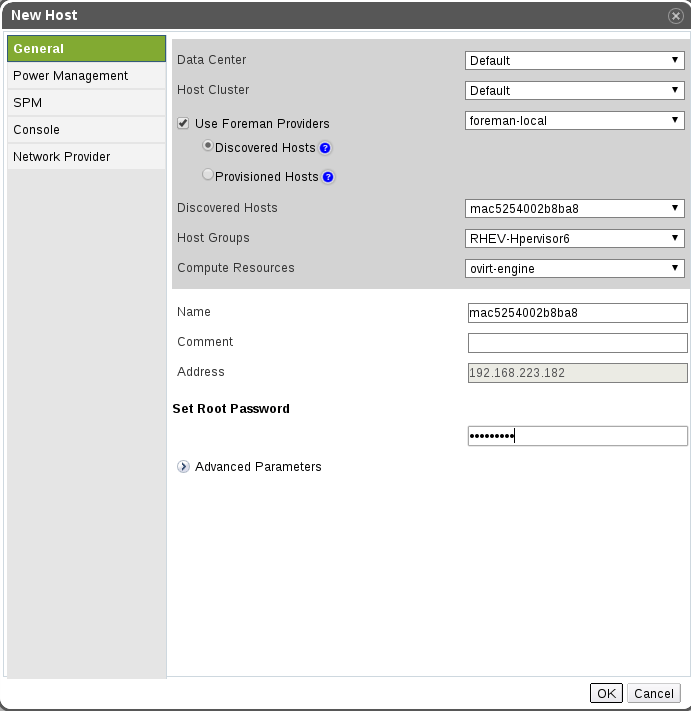
- Once the host provider is configured, go to the Data Center view-> Choose Hosts tab-> Add new Host-> sign “Use Foreman Hosts Providers”-> Pick the provider name and choose Host, Compute Resource that refers to the engine’s setup, and the desired Host Group for the provision.
- When signing “Use Foreman Hosts Providers” the default choice is “Discovered Hosts”. You can also pick Provisioned Host and add them as regular host.
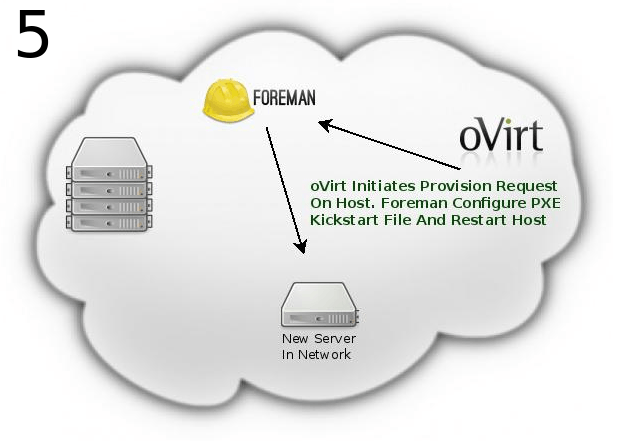
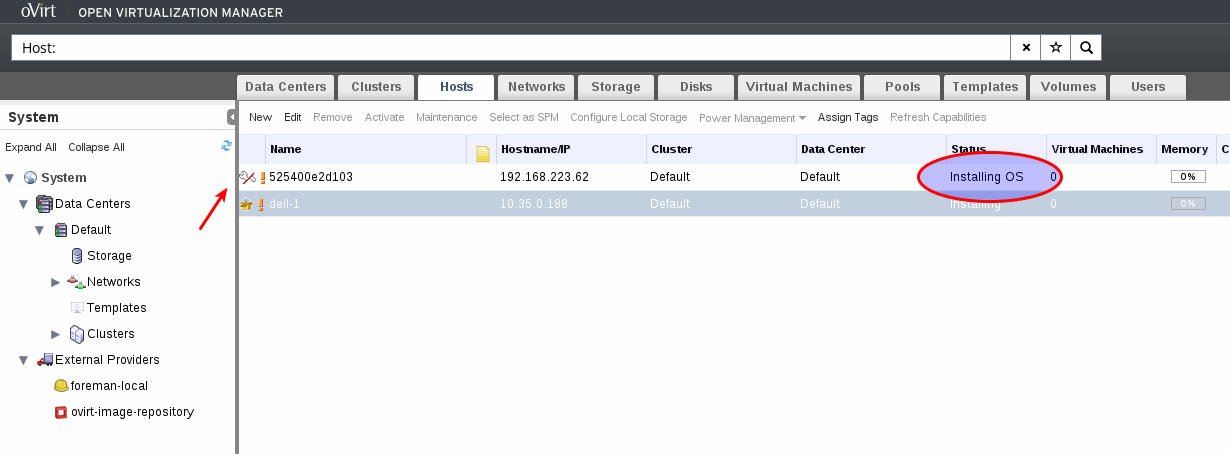
- Once click OK the server will start to be installed. Meanwhile the host’s status is InstallingOS. When provision is done OvirtProvisionPlugin (at foreman’s side) sends request to the engine to reinstall the host. After this is done the host’s status will be changed to Installing->UP.
- On failures please refer to engine.log in the oVirt-Engine setup and production.log in the Foreman setup.
User-flow:
AddNewHost form in oVirt shows new list of discovered hosts taken from Foreman
- Select a HostGroup for this host. All proper configuration needs to be declared in host group definition (part of Foreman setup)
- Select computeResource to allow access back from Foreman to oVirt (part of Foreman setup)
- All “Discovered” information will filled out in the new host form, edit them as desired
The following system flow will occur:
- Add the host to foreman using the API (Provision the discovered host)
- The host will be added and appear in the oVirt UI with status “Installing OS” util the following ends:
- For oVirt-node hosts - the registration will occur through the oVirt-node (assuming the kernel parameters are configured for that Foreman template), and the host will be approved automatically by Foreman
- For other OS - at first step won’t do the registration by themselves, but foreman will do that using a plugin (plugin will send REST-API call to add or approve the host)
Future Plans: VM provisioning
Two alternative:
- Add the VM through oVirt, and then add it to Foreman as bare-metal (add the oVirt compute resource) - only PXE installation, passing the MAC address to foreman
- Add the VM through foreman (Using compute resource) (https://bugzilla.redhat.com/show_bug.cgi?id=1084001)
I’d go with the former option, as it leaves the VM creation similar to what we have today. However, we don’t really leverage oVirt templates with that approach.
Setup Testing Environment
To allow testing the feature in “allinone” configuration, which means running foreman on a VM and simulate new bare-metal hosts with new VMs, you should configure the following on your hypervisor:
(NOTE: This manual set the foreman subnet to 192.168.223.0, which 192.168.223.2 is the foreman VM address and 192.168.223.1 is the gateway to the external network)
-
Enable IP forwarding:
Edit
/etc/sysctl.confand setnet.ipv4.ip_forward = 1 -
Create virt network
save the following to file called
foreman_net.xml:<network> <name>foreman</name> <uuid>3a80901c-a020-4e7a-bd3b-770b29844b03</uuid> <forward mode='nat'> <nat> <port start='1024' end='65535'/> </nat> </forward> <bridge name='virbrforeman' stp='off' delay='0'/> <mac address='52:54:00:38:f9:08'/> <ip address='192.168.223.1' netmask='255.255.255.0'></ip> </network> - Set the network to virsh
# virsh - vdsm@ovirt:shibboleth
# net-define /path/to/foreman_net.xml
# net-autostart foreman
# net-start foreman
With
ip -4 ayou should see thatvirbrforemanhas the right ip - Config engine
# engine-config -s CustomDeviceProperties='{type=interface;prop={extnet=^[a-zA-Z0-9_ ---]+$}}'
# engine-config -g CustomDeviceProperties
( You can read about it under
vdsm_hooks/extnet/README) - Install the vdsm-hook-extnet rpm on host
- Add the host to engine if its not already there
- Create route rule on host
# ip route add 192.168.223.0/24 scope link dev virbrforeman table 170066347(The number of table depends on your dhcp assigned address. You can check for yours by:
ip rule show) -
Configure oVirt
Go to the Networks tab click on “ovirtmgmt” then on the “vNIC Profiles” subtab New -> name: foreman_libvirt_net -> in “please select a key” select extnet and put “foreman” as value
- Set foreman Vm network by running
# ip addr add dev eth0 192.168.223.2/24
# ip link set dev eth0 up
# ip route add dev eth0 default via 192.168.223.1
Make Foreman Appliance
[The following includes for instructions to make your own simple foreman’s environment with discovery abilities. Later we plan to have public template for this appliance]
- I would suggest to do it all in a libvirt environment for testing, unless you have switch and few physical hosts for this test
- For user with virt-manager : Set isolated network with virt manager and create NAT to em1 on you physical hosts
- For ovirt users: Create another network, separated from the ovirtmgmt, all the machine will be connected to this network and will get connection outside by the host itself as default gw
- Install on one machine Centos 6.5 (Don’t create user foreman. Better to leave only root user)
-
Set static IP address in this network
e.g for 192.168.100.0 subnet:
vi /etc/sysconfig/network-scripts/ifcfg-eth0DEVICE=eth0 TYPE=Ethernet ONBOOT=yes NM_CONTROLLED=no BOOTPROTO=static IPADDR=192.168.100.2 NETMASK=255.255.255.0 GATEWAY=192.168.100.1 - Copy
/etc/resolve.conffrom the physical host that runs the VMs and set this host as the default gw - Set EPEL Repo:
# wget https://archives.fedoraproject.org/pub/archive/epel/6/x86_64/epel-release-6-8.noarch.rpm # rpm -ivh epel-release-6-8.noarch.rpm - Install foreman:
# yum -y install http://yum.theforeman.org/releases/1.6/el6/x86_64/foreman-release.rpm
# yum -y install foreman-installer
# foreman-installer -i
while running the last command please note:
- enable
foreman_compute_ovirtandforeman_plugin_discovery- you can always re-run it so don’t worry about mistakes - better not to install
puppetdb_foremanto avoid Bug http://projects.theforeman.org/issues/3570
At the end you should see:
  Installing   Done   [100%] [.........................................................................................]
   Success!

 * Foreman is running at https://localhost.localdomain
       Initial credentials are admin / NUrbTvc6Vkv6XNxa
 * Foreman Proxy is running at https://localhost.localdomain:8443
   * Puppetmaster is running at port 8140
   The full log is at /var/log/foreman-installer/foreman-installer.log
In case something failed follow the errors and try again. Don’t move on with the instructions.
- enable
- Stop the iptables on your foreman machine
# iptables -F - Go to foreman web interface and change admin password
- In the WebUI: Go to infrastructure -> provisioning setup -> follow the guide and configure and dns and dhcp by the foreman-installer command that the foreman suggested (see [1])
- Run the installer with the desired configuration
- Install the ovirt provision plugin
# yum -y install ruby193-rubygem-ovirt_provision_plugin - Install the discovery images
# foreman-installer --foreman-plugin-discovery-install-images=true -
Go to the ui again ->Hosts->Provisioning Templates-> find PXELinux global default and add there in the end:
LABEL discovery
MENU LABEL Foreman Discovery
MENU DEFAULT
KERNEL boot/foreman-discovery-image-latest.el6.iso-vmlinuz
APPEND rootflags=loop initrd=boot/foreman-discovery-image-latest.el6.iso-img  root=live:/foreman.iso
                  rootfstype=auto ro rd.live.image rd.live.check rd.lvm=0 rootflags=ro crashkernel=128M
                  elevator=deadline max_loop=256 rd.luks=0 rd.md=0 rd.dm=0
                  nomodeset selinux=0 stateless foreman.url=`[`https://192.168.100.2`](https://192.168.100.2)` <-- here put the foreman's ip
IPAPPEND 2
Change also - ONTIMEOUT discovery
- Go back to Host->Provisioning Templates and click on “Build PXE defaults”
-
Create puppet module for the engine’s ssh pk
Go to Foreman’s appliance and create a folder under
/etc/puppet/moduleswith the follow directories (the directories’ names are important. otherwise puppet doesn’t recognize the classes):-
Directory
files-> under it put theauthorized_keysfile filled with the engine’s pk and set the file with execute permission.e.g:
ssh-rsa AAAAB3NzaC1yc2EAAAADAQABAAABAQCvNAlTKk/L2I+uyzeqKPErywGgFuQ0GQVf4HT4ir64Wi41SDwtt0edVQ8PwAeyY2jhbwGy0EzPgg0z/SVFIay5uEDSS8ObPICpTNpVlLp5618DKlCnOo3AwYMqbSBsPw6mKVnTvGjdw3lbBey/mEWrx5w7QHJw6FqwDyQ4big12yOECigGr1NYZWzsdVgDzI5oG3fbYHj/tfdDYfeWixNVZG4a0wBONjKJewr8hApMa8BkGJi/gkQ9XWjfx/RClHXWwgR1YMEUG0oBxWf394tueytheAxhYyujq7TOfgwC1cCa8EYUJxEbNuCjL25b1WnC+hp66/O8TYRTpWBFs9Y/ ovirt-engine -
Directory
lib-> empty dir (there are puppet plugins which look for the lib directory, so better to have it if you installed one) -
Directory
manifests->init.ppandsite.ppinit.pp:class ovirtpk { # create a directory file { "/root/.ssh": ensure => "directory", mode => '0700', owner => 'root', group => 'root', before => File['/root/.ssh/authorized_keys'], } file { "/root/.ssh/authorized_keys": path => '/root/.ssh/authorized_keys', ensure => file, mode => '0600', owner => 'root', group => 'root', source => "puppet:///modules/ovirtpk/authorized_keys", } }site.pp:node default { include ovirtpk } -
Directory
tests->init.ppinit.pp:class { 'ovirtpk': }
-
- Run
puppet apply /etc/puppet/modules/ovirtpk/manifests/site.ppto verify that all set as needed. andpuppet agent --test - In Foreman’s UI: Go to Configure->Pupppet Classes-> click on “Import from [your-hostname]”
- Now run new host in the same network and you’ll see the discovery screen. when this host\vm will finish to boot you should see new entery in the Hosts->Discovered Hosts page
- If you’ll add this foreman server as external provider to ovirt, you will be able to see discovered host in the add host tab and follow the instructions above.
Benefit to oVirt
- Better integration with external host providers, that will ease the work for the administrator
- Providing an interface that other host providers can implement, to add their own properties and logic
Documentation / External References
- Foreman homepage: http://theforeman.org/
- Presentation for CloudOpen NA, 2014 - Integrating oVirt and Foreman to Empower your Data-Center: https://www.youtube.com/watch?v=gozX891kYAY